Monday, April 29, 2013

Paper Flowers Blog Hop


Happy Monday Blog Hoppers!!!

Can you believe it?  The Paper Girls Challenge Blog invited me to hop along with them - love those girls!!!

For this hop, you will see a plethora of pretty practical ways to use/create paper flowers on your projects.

I tried something new for this hop:  Coffee Filter Flowers.

Happy Mother's Day


Happy Mother's Day

Love


Would you like a quick tutorial on how to make these cute flowers?  Perfect, because I wanted to share with you anyway!

Materials:  basket coffee filters (those are new)
mists - Mr. Huey's Custard (from my stash about one year ago)
Tattered Angels Glimmer Mist Santa Baby (from my stash - at least two years ago!)
Adirondack Color Wash Lettuce (from my stash - at least two years ago!)
brads or twine (brads are from my stash - 6 months ago - twine is new!)
Embellishments:  Most are from Webster's pages (last summer)
Cardstock:  Kraft paper - that's new!

* Mist the coffee filters and let them dry about an hour.
* Fold the filters into quarters.
* Cut the edges - I used a couple of punches, "points", or "petals".


* Separate the trimmed filters.
* Restack filters by staggering the layers.


* Pierce a hole in the center for either a brad or twine.

* Gather the petals - pinch, fold, fluff to your desired effect.
* Affix to a project!


Again, thank you for stopping by!  Here's the hop in order.  Be sure to comment, follow and have fun!  There are prizes to be won!


What do you have to do to participate? 

 Would you like a chance to win? Get one entry for commenting on each of the blog posts, "Like" the Paper Girls Challenge on Facebook, and being a follower on our blog (all are required for an entry). It you get to see some fabulous projects and you know you want to!

You have until Sunday, May 5, 2013 at 11:59pm MST to comment.  We will announce the winner on Monday, May 13, 2013 at 9:00 am MST!  International readers are welcome to play along but currently we are only shipping prize packs to the US and Canada due to shipping costs.

The PRIZE

PS ... want an win an extra goodie?  One lucky hopper will be randomly selected to win a fun prize from me.


Thank you so much for stopping by!


Monday, April 15, 2013

To Love The Journey: Scenic Route

I'm back at Paper Girls Challenge blog with my second installment as April Guest Designer.  This challenge involves "Travel".  

Immediately, I knew which photos I had wanted to scrap for this layout!  Last year, we drove to Jersey Jim's Fire Lookout Tower and spent two nights up in the tower.  Its five stories up and the latrine is five stories down.  A bit of planning must go into your ascent and descent!

While we were at Jersey Jim's, we did a bit of hiking, hiking and more hiking!  It was a truly memorable time with the kids and I look forward to more camping trips with them as the summer approaches.


I used a sketch from Scrapbook.Steals.com - Amber 4


I do hope that you are inspired by the Bev Code's sketch, my interpretation of it and the fun challenge from Paper Girls Challenge blog.

Materials used:  Webster's Pages, StampinUp punch, We R Memory Keepers stamps, Love My Tapes washi, and a map of Colorado

Sunday, April 14, 2013

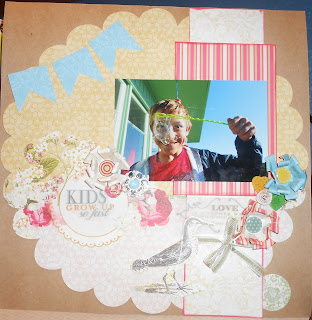
Kids Grow Up So Fast

I've had this photo of my son on my desk for almost a year and I'm drawn to it often.  I've wanted to create a layout for this photo for quite some time - but just couldn't find the "right" materials.

Kids DO Grow Up So Fast - as I linger over the photo of this boy with a bubble wand I cannot believe that he will be moving on to high school in a few weeks - less than two months!  He's such a treasure!

The title velum and the secondary "Love" velum are from my stash and have to be from four years ago.  My friends over at Use It Tuesday have a challenge to use stickers.  I used the velum and made them into stickers - clever, huh?


Amber #8 sketch from Scrapbook.Steals.com

Materials used:  Websters' Pages, StampinUp! punches, ribbon and flower brad
Velum from probably four years ago!!

Monday, April 1, 2013

April Showers ... May Flowers

Good morning my dear scrappy-happy friends!  I am over-the-moon thrilled to be a guest designer for the Paper Girls Challenge Blog.  Being part of an online scrapping community has really pushed me to continue developing my skills and it also provides me with a sounding board for when I'm not that excited about a layout or card.  Some of my best friends are the gals that I have met through scrapping.  

(An updated photo - thanks to my boy, William)

I do hope that you enjoy the layout I've created for the April Showers Challenge:


I've been just crazy about Kraft paper lately and I really love how it provided a background for the colors and flowers I used in this layout.  I used Studio Calico paper, Kiwi Lane Designs templates, a few stickers from Authentique, an embellishment or two from Webster's Pages and punches from StampinUp!

So, you want to know more about the crafty tricks behind this layout??


In order to create the raincloud and raindrops, I used mists and transparency sheets.  Just scatter several large droplets of misting ink onto the transparency sheet and then cover with another sheet - you get a two for one here - press them together and then pull apart the sheets.  Leave the sheets to dry and then cut to your {heart's} content.  Super easy!


I have a couple of different types of flowers on this layout.  I created the small rosette flowers by using a 1" punch from StampinUp! and then cutting a spiral into the punch.  Carefully rolling the paper on itself, you will achieve a tight rosette.  Glue that baby and you are set - I add a little touch to mine by pressing down on the edges of the flower to get a petal look - a friend of mine sprays the flower first and then presses - either way - its not difficult at all.  Another flower that I made is with a scalloped 1-3/8" punch again from StampinUp!  I cut into the scallops and then curl the petals.  Ta-dah!


Thank you Kristy Lee!


And there you have it, a layout that will hopefully inspire you to create something wonderful.

Materials used:  Kiwi Lane Designs templates:  Wildflower 1T, 6T, Chestnut Drive 2B, 3A, 3B
Studio Calico Memoir Collection Flower Bed and embellishments
Tim Holtz Distress Ink Vintage Photo
Webster's Pages embellishments
Authentique words
Basic Grey "april" letters


Friday, March 29, 2013

Think Spring!

Happy Scrappy Day to you!


I love making cards - there are times when I just get into a groove and I'm in it right now!  I've been making Easter cards, Birthday cards, Thank You cards and then I saw that Use It Tuesday's challenge is to create something with Spring in mind!  Yahoo!!!!


I used a bunch of markers that I've had for yeaarrrrs and the stickles glittery type stuff has been around since, well - I really don't remember - and the card stock has been in the stash for at least four years.


Enjoy my take on Think Spring!


Thursday, March 28, 2013

Good Friday Crafting

Tomorrow is Good Friday and I'm usually in a somber mood given that Good Friday is the day that our Lord and Savior died on the cross for us, so today I am busy crafting and cooking.  I'm trying my hand at a lamb cake for the very first time!

While waiting for the cake to cook, I was working on a collection of cards that I created for our neighbors.  The cards will be delivered today by my little ones along with a beautiful mum plant.


Happy crafting and The Johnson family wishes you a very blessed Easter.  He is RISEN!

Wednesday, March 27, 2013

Easter Wishes

While playing around with some cards, I created these Easter cards - I really love them!  Hope that you enjoy them as well:


Materials used: Authentique's Hope and Prima Marketing flowers


Monday, March 25, 2013

Drill #3- Four Focus Fun! {SWAT}


Drill #3- Four Focus Fun!


Just as a four leaf clover brings good fortune, so does this challenge from my friends at Scrap Warriors Advanced Training.

Here's the deal - simply create a single page layout using four photos.  I went one step further - this is from Four Corners, AZ.  You know, that very famous place where you can be in four states at one time, AZ, CO, UT and NM.


Have a scrappin-fun day!

Saturday, March 23, 2013

True Love {KLD}

Hey Friends!!

I recently won a cute package of fun from Kiwi Lane Designs which contained We R Memory Keepers' True Love.  Well - talk about true love - beautiful papers, twine and bottle caps - woo - hoo - BOTTLE CAPS.

Here's what I created for a friend who was married today!


Of course I used a couple of the KLD templates and had a little fun with this layout.  I left off any titles, journals, and photos as it was a gift.  I told the bride that I would be happy to finish it when she was ready.

Thank you KLD - Its a fun set to work with!


Photo Inspiration #28 {PGCG}

Good morning Crafty Friends!  My gal pals over at Paper Girls Challenge have issued a new challenge:  #28 Photo Inspiration.  Here's the photo:

What inspires you? 


 For me, I loved the colors that I saw and the shape of the tag made me think of lots of squares.  The flower that jumps out from the tag is what inspired the oval and it its outline.


After reading the blog post and seeing what the other designers did/said, other designers said that they had not tried water colors and for me; I decided that it was time to try something new - gesso.  


I really love how this layout came together and I tried something new.  Have a scrappin-happy day!

Friday, March 22, 2013

Gesso How-To


Good morning to all of my scrappy-happy friends!

I am very excited to share a Gesso How-To with you - this stuff ROCKS!  I came across gesso while reading a scrapbook magazine and I just fell in love with the look.  I’m a clean-and-simple style of scrapper and this rocked with my inner-scrappiness.

Gesso is an acrylic base that is used by canvas artists.  They use it to prime the canvas in order to prep their work surface.  In order to find it, you will need to look in the fine arts section of your local hobby stores.  I snapped up a pint of the white gesso ran home as fast as my little legs could carry me and opened up the jar immediately for some crafty fun.


The supplies pictured above are:
12” x 12” kraft card stock
paintbrush
gesso
2” x 4” green card stock

The really cool thing about gesso is that you can spread it on with a brush or with a card (I’ve seen blogs where gals use a plastic card - you know those endless gift cards that you have at the bottom of your purse - they work great, too!).  I used both.


When I was prepping the 12” x 12” kraft card stock, I brushed on the gesso and I used my green card stock to spread it on.  Then I also dabbed with my brush to finish off the area I wanted to cover with the gesso.


You do need to give it a few minutes to dry and then continue working on your layout.  I really like the way that ink and mists look on the gesso as well as some doodling.


Here’s another layout that I did with gesso - this was my first trial run at it.


One other thing that I’ve leaned about gesso is that you can put it on very lightly almost like a whitewash or you can glob it on and then create designs in this medium.  So I tried my hand at it on an 8.5” x 11.5” piece of kraft card stock.  I globbed on some gesso and then took a paperclip and dragged it through the gesso creating random patterns.


Once the gesso was dried (about an hour), I created this layout of my husband when we were camping last year in Iddlywild, CA.  This is how I feel about my husband after all these years ... captivated by him.


So, scrappy happy gal pals - I do hope that this is a technique/medium that you are going to try.  Have a wonderful scrappy day!!

Friday, March 15, 2013

Spring ATCs {Artist Trading Cards}

Happy Spring!  A fun, cute, EASY ATC for your viewing pleasure today.

I wanted to work on these for so long and was really stuck on what to do, but after cutting all of the 2.5" x 3.5" Kraft paper and rummaging through some of the more spring-like paper that I have, I decided on this very soft print.  Then I dug out all of my StampinUp! stamps and instantly knew that I had to put a butterfly on this ATC.  Spring is a time of renewal and the best symbol for this is the butterfly.  The "Easter Wishes" stamp is also from StampinUp! and I used Old Olive ink.  There is a hink of purple on the flowers - those are my lovely Stickles.


Have a great day!

Also, I had wanted to submit this for Use It Tuesday's Challenge #50 "Uninked Stamp" - ah, well - next time!!

Monday, March 4, 2013

{Love My Tapes} Blog Hop Winner!

Good morning Blog Hoppers!


This weekend was certainly fun - the Scrapbook Steals blog hop designers created such fantastic projects - I'm certain that you cannot wait to get scrapping yourself!  Inspiration galore!

And now the moment you've been waiting for ... my own blog winner randomly chosen from this weekend's hop is:

Sandy T.

Sandy T., please send me an email at scrappin {at} q {dot} com with your address and I'll send you a little slice of scrappy goodness.

Have a great day everyone!

Friday, March 1, 2013

{Love My Tapes} March Blog Hop


Welcome to the Scrapbook Steals March Blog Hop!  I really enjoy working with Scrapbook Steals because their blog is just chock full of inspiration, tutorials,customer service, wonderfully supportive online community and of course their STEALS!!

This blog hop is going to blow you away with amazing projects created using ... are you ready ... Love My Tapes washi tape.  Seriously, if you have not tried their washi, then what are you waiting for?  Hop on over to Scrapbook Steals and grab some for yourself.

For this hop, I created the following projects using Love My Tapes washi tape.  I really hope that you find the projects easy, fun and something that you can create easily.


First, I created a "things to do!" clipboard.  In order to make this, I covered a clipboard with kraft paper and then went to work on adhering the black and white chevron washi tape.  To top it off, raspberry colored Thickers to add a bit of color.


I love journals - they are incredibly easy to decorate and make great gifts for most anyone.  This journal is a composition notebook that was covered with some pretty patterned paper from Prima Marketing.  I removed the black binding tape and added the green washi, wrapped the cover with bakery twin and then added two flowers from Webster's Pages.  The letters are also from Webster's Pages.  I also wanted to keep track of some of my favorite journal pages so I made these adorable paper clip tabs.  Simply cut a length of washi and close it around the end of the paperclip.  To get the banner look on the end, I used a 1 1/4" square punch from StampinUp!  Why have I not thought of this before???  The punch creates the perfect "v" shape at the end of the washi.


And finally, a card.  If you've been following me for a while you know that I love designing cards.


As you can see, washi tape is a very versatile product and one that should be in your arsenal of scrapping goodies.

Be sure to leave a comment on my blog, all of the designers blogs and over at the blog on Scrapbook Steals' blog in order to be entered into a drawing for a $20.00 gift card to Scrapbook Steals.  You will have until Sunday at Midnight Mountain Time to comment.  Good Luck!

Now, if you are interested in winning more scrappy goodness, then be sure to become a follower and leave a comment stating new follower/current follower and which project you could envision yourself creating.  Again, you will have until Sunday Midnight Mountain Time to comment.  Good Luck!

ScrapbookSteals starting point
Creating with Paper and More - Kelly Holifield
The Ramblings of a Crafty Working Mom - Julie Cordero
Scrappin The Little Things - hey - that's me!! <-------------- you are here
Li'l Buck's Creations - Misty Buck <--------- next on the hop
Becci's Handmade Collection - Becci Manies
It's About the Paper - Michele Duffy
Errant Scraps - Jessica Arrant
ScrapbookSteals ending point